Back in the fall (I know! so long ago!), I took on a bit of an adventure in our guest bathroom. It had some dated wallpaper that was already peeling up a bit, so I decided to dabble in wallpaper removal. It can't be that hard, right? Here's what we started with:
Yeah, so do you get why I wanted to get rid of it? I started by simply peeling up the wallpaper all over the entire room. The paper itself was pretty thick, so it came up pretty well for the most part. This part probably took me half an hour.
In pulling it up, I found out that the room had never been painted! The wallpaper was placed directly onto the drywall, which I don't know if it was a good or bad thing. I had to use a putty knife and a spray bottle full of water to get the bottom layer of paper and adhesive off. It worked great in most areas, but some took some extra tedious work and it only came off in tiny pieces. This was the most time-consuming part, but I just did a few hours at a time on random week nights and some on a weekend. I was amazed at how much paper came off those walls in that small room!
Once I got that done, I gave it an overall sand and also filled in some uneven spots with putty, and then sanded those parts down. After that it was time to go buy myself some paint! The bare drywall made me feel like I needed to prime it first, just to seal out moisture (since it does have a shower in it) and help the paint to stick well and look polished. I know it's not my house, but I wanted to do it right. I was glad that I did this step!
Doesn't the paint make the white tile look so much "whiter" than before? I chose Behr's Mineral for the color, which is sort of a greige (gray + beige). I saw it on Michelle's blog in her kitchen makeover, and I knew it was the color I wanted. I'm so happy with it!
And here is the finished result...
It's not a huge difference color wise, but it getting rid of those... stripes? woven spirals? bamboo? whatever you call them... made such a difference to me. I think it was worth it! If it were my own place I would probably do some more things, but for now I am happy with these results that only cost me the price of the paint.
Both of our other two bathrooms have wallpaper, so we'll see if I get around to doing those too! I'll keep you posted :)
Showing posts with label diy. Show all posts
January 15, 2013
February 27, 2012
DIY Laundry Detergent
This weekend I decided to do something a little crazy... I made my own laundry detergent!
Now before you freak out and think I've gone all granola on you, I didn't do it because I think the chemicals in laundry detergent are harmful to the environment. I just simply hate spending $8-$10 on laundry detergent every few months (I quit buying the cheap stuff because they make the colors fade). So when I saw this tutorial for making your own laundry detergent that works better than normal detergent, and how easy Jen made it look, I decided to try it! Jen says that this laundry detergent should cost $28 a year if you're doing 6 loads a week.... I don't know about you but between the two of us we probably only do 2-3 loads every 2 weeks. So based on her math that works out to less than $6 a year for our laundry!! Plus the fact that it has fabric softener in it, so I'm thinking I won't have to buy any more dryer sheets either.
To make your own laundry detergent you will need:
1 (4 lb. 12 oz.) box of 20 Mule Team Borax
1 (3 lb.) container of OxyClean (optional, but definitely will make it more effective)
2 (2 lb.) boxes of Arm & Hammer Baking Soda
1-2 (55 oz.) bottles of Purex Crystals fabric softener
1 (3 lb. 7 oz.) box of Arm & Hammer Super Washing Soda
2 (14.1 oz.) bars of Zote soap (or Fels Naptha)
Everything should be found in the detergent aisle, except for the baking soda which is in the cooking aisle.
I spent $23 on all the products I could find at Target. Two of the products - Zote soap and Super Washing Soda - I couldn't find at Target. I found them on Amazon for a total of $18.23 and with my prime membership they shipped in 2 days for free. (I considered buying all the ingredients at Amazon in the future, but I discovered that most of them cost more on Amazon than at Target.) The total I spent is about $42, plus $4.50 for a large plastic bin to store it.
It sounds like I spent more than Jen, since she claimed to spend $27 for everything. I'm not really sure how she did that?? The Zote soap and Super Washing Soda must be a lot cheaper to buy in-store. However, I am still confident that the $42 I spent will go a long way, and in the end be much cheaper than buying detergent by the bottle!
Before I mixed everything together, I put everything in the bin just to make sure it would fit!
With all the gaps in between the boxes I figured I had enough room to add in the Purex Crystals, too.
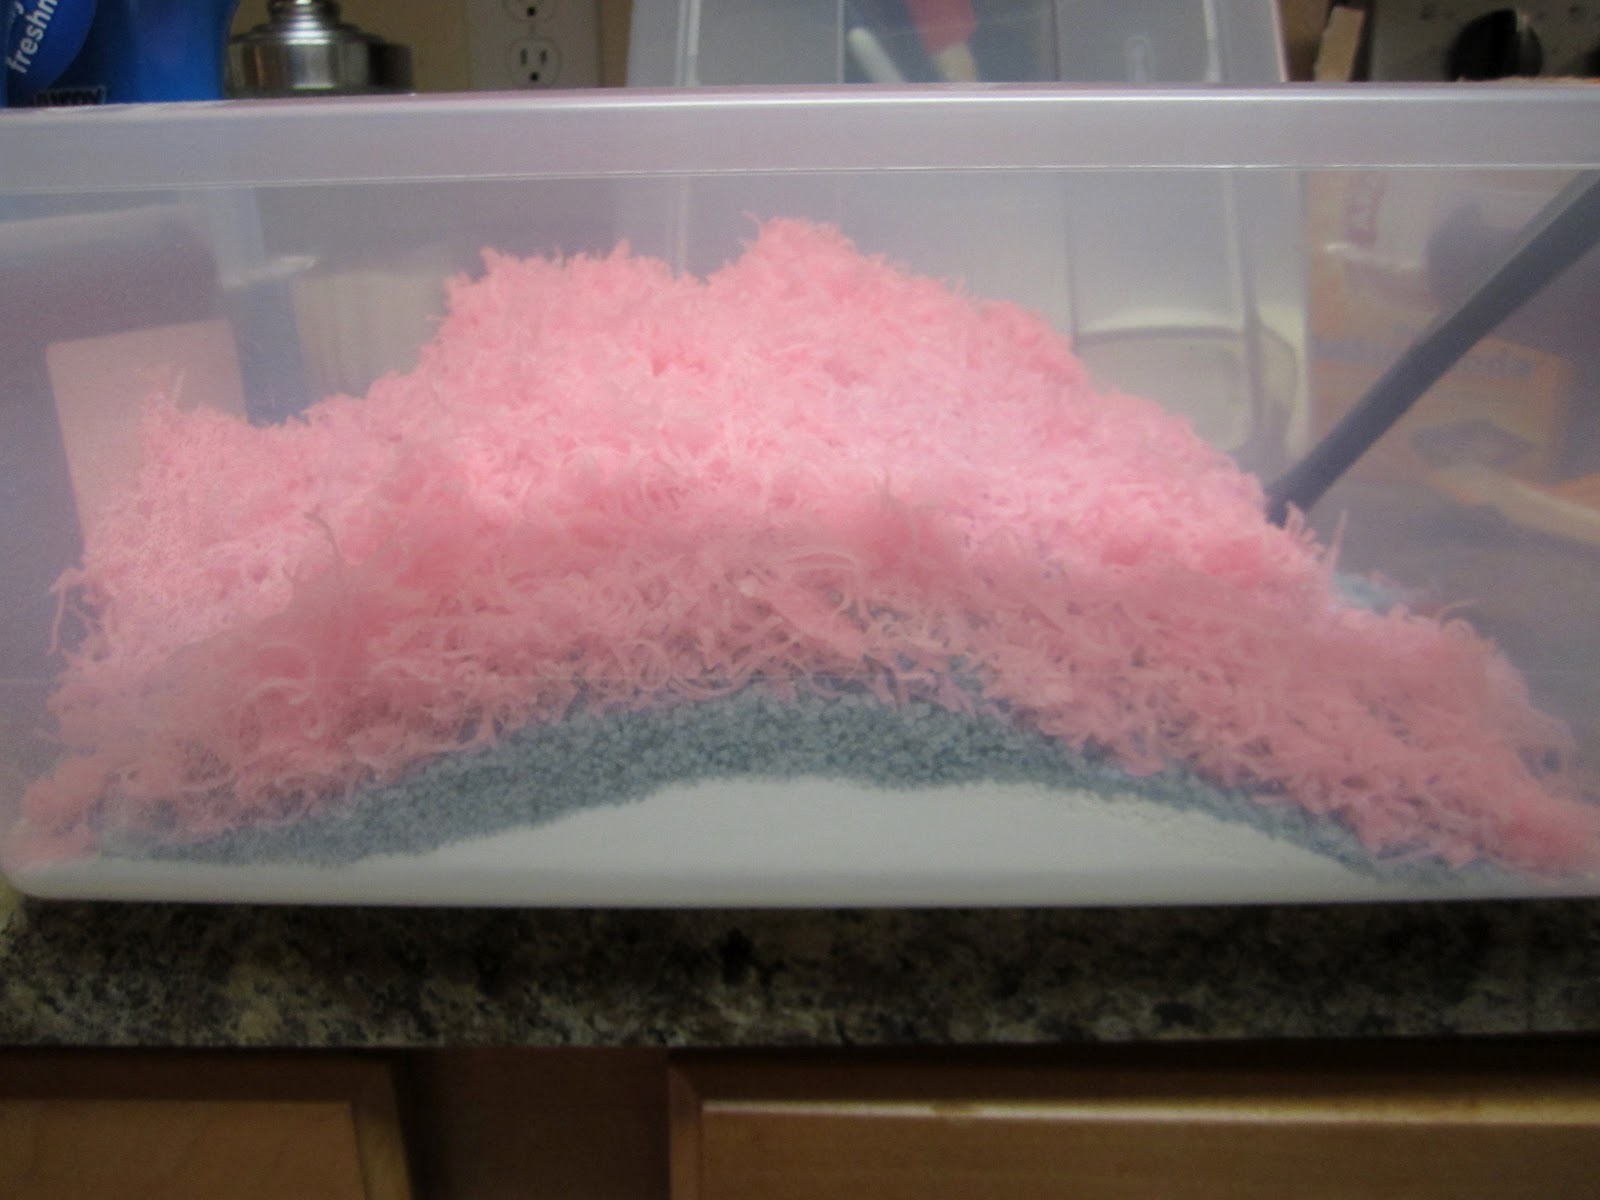
It's a no-brainer to figure out how to mix all the dry ingredients together. However, the Zote soap bars had to be grated. Yes, I said grated. Like with a cheese grater. This part got a little weird. Let me reveal to you the pink cheese.
It looked really cool when I put it all together in the bin! I only put in half of each ingredient first just to make it easier to mix.
I used a slotted spoon for mixing. I think that helped.
Jen said she used the Purex bottles to store a smaller amount for everyday use. I quickly discovered that the hole to pour out of it was too small and the shredded Zote soap was getting stuck in it. So I brainstormed. I considered buying another smaller plastic bin, but decided on just using the OxyClean container, since it would be easy to scoop out of and it was FREE! I also held onto the scoop that came with it.
Since I didn't want it to have the OxyClean label, I painted over it in a color I love! I homemade the detergent, so why not have a homemade container for it??
One other awesome thing about this detergent is that you only need to use 1-2 tablespoons per load! Seriously, this stuff will last me forever. Line 1 in the OxyClean scoop is conveniently about 2 tablespoons.
Here it is on top of my dryer for easy access.
I keep the larger bin up on the shelf, and when I run out of detergent in my pink bin I'll just pull it down for a refill. The bin ended up being the perfect size!
So far I have done 3 loads and I love the way my clothes smell when they come out of the dryer! I am excited that my Target shopping list will not have laundry detergent on it for a long time.
Have you done anything lately that's a little bit "granola?" Do you make your own household products? Have you made your own laundry detergent before?
Linking up to:
Meet Me Monday
So Creative Party Time
What's in the Gunny Sack?
Have you done anything lately that's a little bit "granola?" Do you make your own household products? Have you made your own laundry detergent before?
Linking up to:
Meet Me Monday
So Creative Party Time
What's in the Gunny Sack?
January 21, 2012
Goodbye, Secretary
Let me clarify: I am not forcing my husband to fire his secretary because I think she's too pretty (okay, okay, bad joke). This post is about this cute little secretary desk I bought off Craigslist over a year ago. While it looks adorable in our little nook, it is extremely non-functional because it is not deep enough to use with a laptop, or anything really. I basically only use it to store my stationery, which is about all that it holds. I also have never been a huge fan of the Queen Anne's style legs.
While it doesn't do the job we want it to in this space (we really need more surface area and shelving), it actually has a lot of storage and has so much charm and character. I can just see it painted white for a little girl's bedroom one day in the future. So when I really though about it, it makes more sense to keep it as an investment and get rid of the one that doesn't really do anything for us. So we'll move this one into the nook area. I have already been brainstorming ideas of how to spruce it up and tie it in with the colors in our living room (read: paint!). Of course you know I will post about that project when the time comes! For now, I need to sell/donate the secretary first so we can move the other desk into its place, and then we'll have the free space in the office to move in a larger desk once we find one.
| remember this guy? |
So, we're selling it. Anyone want a cute decorative desk that doesn't do much else than look pretty?? The big deciding factor was that in our search for a larger desk for the office, I realized that I didn't want to part with the small desk we already have.
| this area of the apartment hasn't gotten a lot of love, has it? |
While it doesn't do the job we want it to in this space (we really need more surface area and shelving), it actually has a lot of storage and has so much charm and character. I can just see it painted white for a little girl's bedroom one day in the future. So when I really though about it, it makes more sense to keep it as an investment and get rid of the one that doesn't really do anything for us. So we'll move this one into the nook area. I have already been brainstorming ideas of how to spruce it up and tie it in with the colors in our living room (read: paint!). Of course you know I will post about that project when the time comes! For now, I need to sell/donate the secretary first so we can move the other desk into its place, and then we'll have the free space in the office to move in a larger desk once we find one.
So that's the plan! Anyone have any ideas as to how I can spruce this desk up? Paint colors and fixture suggestions? I would love to hear from any of you... I am always looking for out-of-the-box decor ideas. Hope you are having a great weekend!
[If you live in NC and are interested in this desk, here is the link to our Craigslist listing.]
January 12, 2012
Fun DIY Ideas
In my hunt for a new office desk, I've been perusing DIY projects for some inspiration. Believe me, some of these things I'm seeing on Craigslist are going to need a LOT of creativity to bring something good out of them! Luckily there are millions of blogs out there of people who turn some really ugly things into awesome creations. Maybe they'll inspire you to do something similar!
Pottery Barn-esque desk made from scratch
Color splashed chairs
via Fresh Cut Flours
Doily Frosted Mirror
via papernstitch
Faux bamboo makeover
Before
After
Dresser turned TV stand
via How Does She
Before
After!
December 5, 2011
Cranberry Ornaments
I can't believe my long weekend is over! I had an amazing four day weekend that was full of spending time with friends, visiting newborn babies, and decorating for Christmas. It was fantastic! We picked up our tree on Friday and I am absolutely loving the evergreen smell and the coziness of the lights in the evening! I have some fun projects to share with you. I also managed to somehow get glitter all over my apartment. I don't know how, but whenever I get glitter out, it somehow always spreads itself everywhere, even in the places I wasn't using it. Did you have a good weekend as well?
I took advantage of the amazing deals all the craft stores are having (50% off most of the Christmas decorations!) and bought 8 glass ball ornaments, a big bunch of cranberries, and champagne colored glitter. I cut a small sprig of cranberries, glued glitter to them, and then glued it to the metal cap of the glass ornament and stuffed them inside the ball. I think they turned out so cute! I love that you can see the Christmas lights through them.

One of the projects I attempted was making these cranberry ornaments, found at a favorite blog of mine, Ten June. I thought Michelle's idea was so unique, and I decided to try it. What do you think?
I took advantage of the amazing deals all the craft stores are having (50% off most of the Christmas decorations!) and bought 8 glass ball ornaments, a big bunch of cranberries, and champagne colored glitter. I cut a small sprig of cranberries, glued glitter to them, and then glued it to the metal cap of the glass ornament and stuffed them inside the ball. I think they turned out so cute! I love that you can see the Christmas lights through them.
I had some cranberries left over, and used them to decorate our dining table. I'll be sharing that in a later post!
There are probably a million different things you can do with these glass balls to create fun ornaments. Have you tried any lately? What are some of your favorite Christmas tree decorations?
P.S. I'm starting a new chapter in my career today, and I am super excited. Wish me luck!
November 29, 2011
DIY Christmas Trees
The Christmas season is finally here! I am kicking it off by joining a link party over at Hi Sugarplum! to share my first 2011 Christmas craft with you. I'll hopefully be linking up with everyone for the "Christmas Cheer in the Blogosphere" link parties the rest of the month as well. If you have some fun Christmas ideas to share, you should consider joining these fun link parties!
Just realized that I need to get my Christmas tree set up by December 8th... okay, better get on that!
The Christmas craft that I'm going to share with you is how to make cute little Christmas trees for a tabletop or mantle. I was brainstorming on what I could use to decorate our buffet table in the dining room, and I've seen so many unique Christmas tree ideas (here and here) that I thought it would be fun to try making some of my own.
I like shabby chic, but I don't think it's my style when it comes to Christmas decor. I wanted something fun and colorful, so I decided to hunt for bright red and green scrapbook paper or wrapping paper. At Michael's I could only find shiny wrapping paper (I wanted a matte finish) and no patterns that I liked. I then found a few sheets of scrapbook paper I liked (4/$1 sale - score!) and picked up a few other supplies I would need:
I bought 3 Styrofoam cones (9", 12", and 15"), scrapbook paper, spray adhesive, and star buttons. I debated about bells, ornaments, and glittery stickers for the toppers and decorations but went with these stars, which I'm very happy about.
I basically just started measuring by wrapping the paper around the cones to see how much I would need.
Once I got the paper where I wanted, I drew a line around the bottom as I held it tight on the cone (no gluing yet). I then took the paper off the cone and cut along the line. I didn't do this on the first one, and it was so much easier this way.
I didn't provide a full on tutorial because it was a lot of trial and error cutting, sizing, and gluing. The spray adhesive actually didn't turn out to work well at all. I think it is meant for bigger projects because the sprayer was very powerful and it was hard to be precise and get into tiny spaces. I pulled out my trusty ol' glue gun, and that worked great. Just had to watch my fingers since the heat goes straight through the paper!
After the paper was secured on the cones, I glued the star buttons on top. And here is the final result! The whole process took me about an hour.
Only the largest cone needed to sheets of scrapbook paper. I used double-sided scrapbook adhesive tabs and matched up the stripes way before I started cutting. You can see it up close here, but from far away it looks perfect.
If you have a fun Christmas craft to share, be sure to link up with Cassie today over at Hi Sugarplum! Or you can join in on the fun throughout the rest of the Christmas season!
November 4, 2011
Office Project: Futon & Pillows
So, do you remember our futon?
Directly to the right of this sits the newly painted bookshelf. Yeah... not really working together. I knew once I started this project that something was going to have to change about that futon. My family had it for years. Then I brought it to my house in college, and it that whole time it still had the same black cover (I washed it periodically, don't worry!). Overall, I was going for a bright, crisp look in this room so I wanted something much lighter. It may seem dumb to you to pick the color white for a futon cover (since it will inevitably get dirty), but this is what I decided and what I became set on. Bright white was my color.
I searched all over for a white white futon cover, but no such luck! They sell every color you can imagine, including "natural," which is basically off-white and totally would look bad with my color scheme. But no white white! There were some on Amazon that I could have paid $80+ for but those may have just been "natural," too. I even started looking at duvet covers, but some of those can be just as expensive, and I really didn't want to pay more than $30 since that's what futon covers go for. So I was mentioning this dilemma to Michael's family, and his mom said she thought she might have a duvet cover to give me. It was actually an off-white/yellowish color, but I figured it was free and I could try bleaching it. So I took it home and it fit!
The width was perfect, but there was a lot of extra fabric that hung off the back:
I made sure it was pulled tight in the front (so there was no loose fabric hanging off the edge where your knees go. which would look tacky), and then tucked the excess fabric behind the back of the futon mattress. I also tucked in the front corners so they didn't stick out like points.
To make it the white that I wanted, I bleached it twice - two times I let it soak overnight in bleach water. And it worked great! It's hard to tell the difference in this picture, but you could really tell if you were actually looking at it. The awesome part about it was that it was F-R-E-E!
Whoops, I ruined the surprise of the pillows! Well, those also go along with the futon update I guess :) Here are some more pictures of the finished futon:
I picked out fabric for these pillows at Johann's, and then took it over to a friend's house to use her machine (thanks Leslie!). I loved that I could make them how I wanted - I'm really loving the white and gray ones with the yellow on back. They look good flipped either way!
There's still a lot more I want to do in this room to make it more cohesive. We actually need a new desk (on the left) because Michael will need a good workspace for his new job, and ours is very small. So I'll be on the hunt on Craigslist over the next few weeks. I also want to:
figure out some curtains
paint the shelf or do something completely different on that wall
paint the legs of the TV stand white
maybe paint the end table as well
We'll see how long all of that takes me! :) Changes on beds and couches really make a room feel different, because they are usually the biggest piece in the room. So for now, at least the overall feel of the room is so much better!
[To give them credit, a lot of inspiration for the colors in this room came from Young House Love's office. While it is turning out totally different than their office, their colors really were the start of my inspiration for these projects.]

I added this post to the Polish The Stars link party.

Subscribe to:
Posts (Atom)