December 29, 2011

Christmas in Virginia

We just got home from a fantastic week at home for Christmas. We didn't do some of our normal Christmas traditions this year but we also made some new ones (read: make guacamole on Christmas Eve & have it while we're decorating Christmas cookies!). We had some amazing family time and it was so good to be able to spend so much time at home. Here is our week in a nutshell. We weren't that great at taking pictures so this is what you get!

decorating Christmas cookies


opening presents on Christmas morning

adoring our lovable dogs

ice skating in DC

and best of all: simply getting to spend time with my wonderful family (husband & cousins included!)


Now I'm back to work for a couple days, then we're off to have our second Christmas with my husband's family! I hope you're enjoying Christmas season (not just the day) like we are!

December 23, 2011

Our 2011 Christmas Card

Now that all our friends and family have received our Christmas card in the mail, I wanted to share it with you here! I bought this "card" from an Etsy shop, which was really just the digital version. I didn't really think through how difficult it would be to get it printed as a card with envelopes, so it ended up being not the most economical way to do it. But I loved how it turned out! (The photo is from the photo shoot we did with my friend Blythe over Thanksgiving. She did an amazing job!!)


We are now spending good time with family and enjoying the Christmas holiday. I hope you are getting to enjoy time with the people you love as well! Merry Christmas!!

December 18, 2011

Creamy Chicken & Wild Rice Soup

We just had this for dinner, and it was too good not to share!

via Chef Mommy
Creamy Chicken & Wild Rice Soup

4 c. chicken broth
2 c. water
2 boneless chicken breasts
1 pkg. Rice-a-Roni Long grain & wild rice
1 c. grated or chopped carrots
1 c. diced celery
3/4 c. flour
1/2 tsp. salt
1/2 tsp. pepper
1/2 c. butter
2 c. Fat-free half & half

1. Combine broth, water, chicken, rice, carrots, and celery in a large slow cooker & cook on LOW for 4-6 hours.
2. Remove chicken & shred; add back in to slow cooker.
3. In a small bowl, combine flour, salt, and pepper. In a medium saucepan over medium heat, melt butter. Stir in flour mixture by tablespoon to form a roux. Whisk in half and half, a little at a time, until fully incorporated and smooth.
4. Stir cream mixture into slow cooker and cook on LOW for 15 more minutes.

Makes 8 servings.


I hope you are enjoying your weekend & not as far behind on Christmas shopping as I am!

December 14, 2011

Getting in the Christmas Spirit

I'm feeling a little bit under the weather this week. I also realized I have about a week until we leave for Christmas with the family, and I still have more than half of my shopping to do! Seriously, where has the time gone? I'm looking forward to being done with all the prep and just spending good time with family. Here are a few things that will help get me through the next 9 days.


I just ordered this CD this past week (yes I know that CDs are way old school but I still like them), and the instant I put it in my car I knew it was going to be one of my top favorite Christmas albums. It's just wonderful!


Best. Movie. Ever.


I just love getting cozy on the couch in some comfy pants after a long day at work.

And of course my glowing tree makes everything better!
Are you ready for Christmas yet?

December 10, 2011

Christmas Tabletop

So last year my one Christmas decoration on the dining table was a centerpiece that consisted of a glass bowl filled with cinnamon pine cones and red cranberries. I loved the smell, but it was little blah. The red color was also toward to maroon side, and that was not really going to go well with my brightly colored mantle display that sits right next to the dining table.  So finding some Christmas placemats or a tablecloth was at the top of my to do list.

HomeGoods had a cute table runner for $12.99. I liked the colors but wasn't sure what to pair it with. Remembering that last year World Market had great Christmas decorations, I went over there to check out the selection. They have some good stuff! I ended up finding these awesome green wreath placemats that were on sale for $1.99. I got up to the register and they were marked down to $1! AND I had a 25% off coupon so I ended up getting these suckers for 75 cents a piece. Woohoo! (I also got our gold star tree topper there for about $6, after the discount.)

These cranberries were left over from the DIY cranberry ornaments and the vases (or maybe they're candle holders?) are from the dollar store. Seriously, you can make some really cute displays for less than you think!!


I don't ever fully set this table with place settings because it serves as our dining table and casual kitchen table. We use it too much to have to move dishes out of the way every time we eat or do a project. That is also the reason I don't have a formal centerpiece - salt, pepper, and napkins are needed on this table more than pretty things! One day we will have a dining room and it will be fun to fully set the table :)

How have you decorated your table for Christmas? Do you have special Christmas china? What about centerpieces?

December 8, 2011

O Christmas Tree!

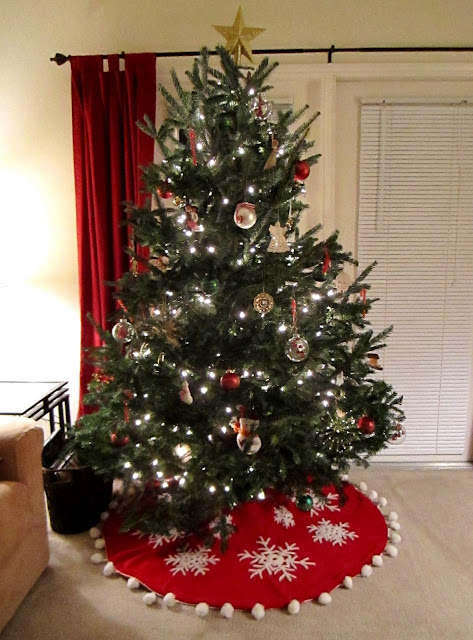
I mentioned the other day that we put up our Christmas tree this past weekend. Well, here it is!


Most of our ornaments are mismatched, but there is a little uniformity with the balls and snowflakes. I got our tree skirt from HomeGoods last year - I still love it and think that I will keep it for a long long time. This year I picked up a new tree topper from World Market, since we had never bought one. I grew up with an angel on our tree, but I love the simplicity of a super sparkly gold star. (You can see one of my cranberry ornaments here, too!)


I love both of these personalized ornaments! The bride and groom one I got at a wedding shower from a family friend, and Michael's sister Elissa gave us the "b" one for Christmas while we were engaged.


Don't forget the VT snowman :) 


 Here is what it looks like from the couch!


Above you can see the little bell on our doorknob that I got from the Dollar Store. Some of their stuff is hit or miss, but usually every holiday season there are a few good decorations there. This was one of them!


...and for the finale...our tree with the lights off. Sitting next to a tree with the lights off is one of my favorite things to do at Christmastime!


Do you have your tree up yet? Do you do white or colored lights? Angel or star topper?

I'm linking up with Megan's post over at Honey We're Home. There are some gorgeous trees over there. I love seeing everyone's different styles and traditions! You should link up your tree, too!

December 7, 2011

Baked Chicken Parmesan


This is the first time I've ever attempted chicken parmesan. I was thrilled with how it turned out! I opted out of serving it with pasta, to save on calories. And honestly I don't think the meal suffered at all! I served this with a salad and rosemary bread, and it was scrumptious. This was plenty for the two of us and another couple. I am definitely going to make this again in the future!

Baked Chicken Parmesan
4 chicken breasts
1 cup breadcrumbs (2 slices of bread if you're making them yourself)
Nature's seasoning/salt & pepper
1/2 cup grated parmesan cheese
2 tbsp. butter
1 cup mozzarella cheese
1/2 jar marinara sauce

Preheat oven to 450°. Spray a large baking sheet with cooking spray. Combine breadcrumbs, parmesan, and Nature's seasoning (view about this here). Melt butter in a separate bowl. Lightly brush butter onto the chicken, then dip in the breadcrumb mixture until covered. Place on the sprayed baking sheet, and repeat with the rest of the chicken.


Lightly spray more cooking oil on the top of the chicken, and then place in the oven for 20 minutes. Turn chicken over, and then bake for 5 more minutes. Remove from the oven. Spread a little marinara sauce in the bottom of a 9x13 baking dish. Place chicken in it. Pour more sauce over the chicken, then add the mozzarella cheese. Put back into the oven for about 5 minutes, or until the cheese is melted.

source: adapted from Skinny Taste


Printer-friendly version

December 5, 2011

Cranberry Ornaments

I can't believe my long weekend is over! I had an amazing four day weekend that was full of spending time with friends, visiting newborn babies, and decorating for Christmas. It was fantastic! We picked up our tree on Friday and I am absolutely loving the evergreen smell and the coziness of the lights in the evening! I have some fun projects to share with you. I also managed to somehow get glitter all over my apartment. I don't know how, but whenever I get glitter out, it somehow always spreads itself everywhere, even in the places I wasn't using it. Did you have a good weekend as well?

One of the projects I attempted was making these cranberry ornaments, found at a favorite blog of mine, Ten June. I thought Michelle's idea was so unique, and I decided to try it. What do you think?


I took advantage of the amazing deals all the craft stores are having (50% off most of the Christmas decorations!) and bought 8 glass ball ornaments, a big bunch of cranberries, and champagne colored glitter. I cut a small sprig of cranberries, glued glitter to them, and then glued it to the metal cap of the glass ornament and stuffed them inside the ball. I think they turned out so cute! I love that you can see the Christmas lights through them.


I had some cranberries left over, and used them to decorate our dining table. I'll be sharing that in a later post!

There are probably a million different things you can do with these glass balls to create fun ornaments. Have you tried any lately? What are some of your favorite Christmas tree decorations?

P.S. I'm starting a new chapter in my career today, and I am super excited. Wish me luck!

December 2, 2011

My Blog is 1!

Happy Birthday to the blog! Today is exactly 1 year since my first post on this blog. It's gone through a heck of a lot of changes along the way - title, objective, audience - and I don't anticipate that it will stay completely the same throughout this next year either. Changes are so fun and exciting. I have especially loved the changes that have morphed this blog into what I truly want it to be. I honestly knew nothing about blogging when I first started writing. I knew how to create a post and publish it, but that was pretty much it. Embarrassing... I know. I had no idea all the cool things the blogging world has to offer! Let's recap all that I've learned this year:

how to change colors, backgrounds, and fonts
how to edit HTML code so that links open in a new window (before they added the checkmark in the link box)
what Feedburner is
what an RSS feed is
how to create tabs and different pages/sections of my blog
how to label posts to make it easier for viewers to see related posts
how to join up with a link party on another blog
how to view all the blogs I follow in Google Reader, instead of on my dashboard
how to edit pictures to make them look better for posts (I use Picasa - not Photoshop but it really helps, especially since it's free!)
follow other blogs that I like and learn from them

That last one is probably the key to me learning so much. I have found so many blogs to follow that I truly love! (Check out those over on the right margin.) Looking at others' blogs has helped me figure out what I want my blog to be, and what I don't want it to be. Bear with me as I'm still figuring that out...

The cool thing is that in the past year I think I've really gotten direction on where I want this blog to go. It's great to look back and see how it's changed, and I feel like I have so much more direction since I have a history of posts. This sounds silly, but the key to blogging is simply posting! If you aren't sure about posting something, post it. If you don't think it'll be interesting to anyone, post it. If you don't know what to post about, pick something random and just post. The more you post, the more you'll think of what to post, and the more you'll have an idea of your favorite topics and more importantly you'll get writing experience.

Anyway, enough of my rambling! Check out some of my top viewed posts this past year:

the master bedroom post

the living room post

the retro post

the college post


the office project posts

and appropriately, last year's Christmas post


Have you been learning how to blog recently? What are some blogging tips you could give me? What are some ways I could improve my blog? Seriously, this is your opportuntity to criticize my blog - I'd love to hear your opinions!

December 1, 2011

Christmas Vignette

When I saw the line up for the Christmas Cheer link parties, I was really intimidated to create a "holiday vignette." I actually had to research online what a holiday vignette even was. I have decorated for Christmas in the past, but I have never tried to make an all out Christmas-ified display. I didn't think I would join the link party today, but I pulled out my Christmas decorations and started brainstorming. I found decorations I had totally forgotten about, and went to work arranging things together. Here's what I came up with!


My Christmas style this year is a little funky. When I was younger, I always thought I would be more of a sophisticated red & gold decorator, but I found some unique, brightly-colored things that I liked and just went with it. I think it's fun because it almost looks like a table full of candy! Since we don't have a fireplace in our apartment, I am also using this as my mantle to display our stockings.

Recognize those buttons? I had to buy the whole package for the scrapbook paper trees, and these were the leftovers. They look so great in a mini mason jar.


These crystal glasses were a wedding gift from my cousin. I actually haven't used them yet, but I've been wanting to put them on display somewhere in my house because they're so cute. I think they turned out perfect with my Christmas decorations!


This adorable little ornament was an old one Michael's mom gave me. I love the vintage look (it really is vintage!), and the colors are perfect with the rest of the table. The candle is one I have on this table year round, and I just placed it on a Christmas box to give it some height.


These are some of my favorite ornaments, and all three were gifts from special people. I love that the dove is on display here instead of getting lost in my Christmas tree. It adds a neat element, and the peace that it represents is front and center.


So what do we think? Do we like the "candy" feel? I'm thinking I like it so far. I may do some rearranging as I continue to decorate the rest of my house, but I love this display for now. What is your Christmas style? Is it similar to mine or is it totally different? 

I'm linking up with A Thoughtful Place for the Christmas Cheer blog party. You should explore all the posts bloggers have been linking up. Some of their ideas are amazing! I love finding new ideas for Christmas decorations!

Holiday

November 29, 2011

DIY Christmas Trees

The Christmas season is finally here! I am kicking it off by joining a link party over at Hi Sugarplum! to share my first 2011 Christmas craft with you. I'll hopefully be linking up with everyone for the "Christmas Cheer in the Blogosphere" link parties the rest of the month as well. If you have some fun Christmas ideas to share, you should consider joining these fun link parties!


Just realized that I need to get my Christmas tree set up by December 8th... okay, better get on that!

The Christmas craft that I'm going to share with you is how to make cute little Christmas trees for a tabletop or mantle. I was brainstorming on what I could use to decorate our buffet table in the dining room, and I've seen so many unique Christmas tree ideas (here and here) that I thought it would be fun to try making some of my own.

I like shabby chic, but I don't think it's my style when it comes to Christmas decor. I wanted something fun and colorful, so I decided to hunt for bright red and green scrapbook paper or wrapping paper. At Michael's I could only find shiny wrapping paper (I wanted a matte finish) and no patterns that I liked. I then found a few sheets of scrapbook paper I liked (4/$1 sale - score!) and picked up a few other supplies I would need:


I bought 3 Styrofoam cones (9", 12", and 15"), scrapbook paper, spray adhesive, and star buttons. I debated about bells, ornaments, and glittery stickers for the toppers and decorations but went with these stars, which I'm very happy about.

I basically just started measuring by wrapping the paper around the cones to see how much I would need.


Once I got the paper where I wanted, I drew a line around the bottom as I held it tight on the cone (no gluing yet). I then took the paper off the cone and cut along the line. I didn't do this on the first one, and it was so much easier this way.


I didn't provide a full on tutorial because it was a lot of trial and error cutting, sizing, and gluing. The spray adhesive actually didn't turn out to work well at all. I think it is meant for bigger projects because the sprayer was very powerful and it was hard to be precise and get into tiny spaces. I pulled out my trusty ol' glue gun, and that worked great. Just had to watch my fingers since the heat goes straight through the paper!

After the paper was secured on the cones, I glued the star buttons on top. And here is the final result! The whole process took me about an hour.


Only the largest cone needed to sheets of scrapbook paper. I used double-sided scrapbook adhesive tabs and matched up the stripes way before I started cutting. You can see it up close here, but from far away it looks perfect.


If you have a fun Christmas craft to share, be sure to link up with Cassie today over at Hi Sugarplum! Or you can join in on the fun throughout the rest of the Christmas season!

November 27, 2011

Photo shoot!

While we were at home for Thanksgiving, we had the opportunity to take some photos with my friend Blythe, who is aspiring to build her brand in photography. I wanted to give her some more experience, and also get some good photos of my husband and me for our 2011 Christmas card. I know this is kind of spoiling our card, but Blythe did such a good job I just had to share! (Be sure to get a good laugh at my model face... yeah definitely don't have "the look" down yet.) I am so happy with these - it will be hard to pick one. I am excited to have some quality photos to frame around the house as well. I never loved the engagement pictures we did back in 2009, so these totally make up for those!! Thank you Blythe, you are wonderful!


Be sure to check out Blythe's blog to see her amazing photography skills!

November 23, 2011

Happy Thanksgiving


Today I am headed home for the first time since July. This trip home is long overdue, and will actually be our longest visit at home since we've been married. To say I'm excited is an understatement! I think was about 8 in this photo, and yes, those are all of my siblings. This is one of my favorite pictures to look at when I get down. I am the oldest, and these guys mean the world to me. I can't believe how things have changed, seemingly so fast. I am so excited to see each and every one of them!

I thought I'd share what I'm thankful for this year, and I think that I definitely ought to make this an annual tradition.

Thankful for in 2011...

My family. (didn't see that one comin, did ya!) I love them all so much and I would be such a different person without them. As much as I've hated them at times, I've loved them 10,000 times more at others.

My loving husband. He takes care of me, makes me feel safe, and makes me laugh. He listens to me. He loves me when I'm being a brat, and he never lets me stay mad at him. I could go on.

God's provision. He really has a funny way of working things out. Just when I think I can do it on my own, He reminds me that I can't. And when I think I'm at my wits end, He reminds me that it's His job to take care of me. And He does - way better than I would have myself.

New friendships. At this time last year, I felt alone and I missed my college friends like crazy. Since then, God has allowed deeper friendships to form with our small group, and brought other people into my life. A tangible community is slowly starting to form, and I don't know where I would be without that!

A warm bed to sleep in and food in my fridge. It seems obvious and cliche, but lately I've really been struck with the fact that I am so much more fortunate than most of the world. Because I own a car, have a mediocre-paying job (by American standards), and can count on my next meal, I am in the top 5% of the world. Crazy.

Prayer. I get to talk to God directly - and He hears me!

The internet. Particularly the blogging world. I have learned so many things this past year from the blogs I follow and from Pinterest! It has been so fun!

Sweaters. Mugs filled with warm drinks. Trying new recipes. All things pumpkin. Warm showers. Fun earrings. Target. Old friends who know me. Newborn babies.


Think of what you're thankful for - it is a wonderful way to get your heart in a good place.
I hope you all have a warm & cozy Thanksgiving tomorrow!

November 15, 2011

Chicken Taco Chili


via Skinny Taste

I have never really loved chicken chili. I think it's because I have only tried White Chicken Chili, and I always feel like there is something to be desired after I finish eating it. I just love the traditional rich tomato-based chili sauce so much, and the white chicken-broth sauce really doesn't quite satisfy me. When I found Gina's recipe, I was excited that it was a red meat alternative to traditional chili and would hopefully still have the same delicious flavor. And I was not disappointed! This is one of the best chilis I've ever had. It's loaded with beans, corn, and that rich spicy flavor my tastebuds crave. I served it over instant brown rice with shredded colby jack cheese and a dollop of low-fat sour cream. I left out the cilantro to save money, but I'm sure that would make it even more amazing. The best part is that the leftovers taste just as great! We served this for four and after already eating some leftovers, we still have more.

Chicken Taco Chili

1 onion, chopped
1 16-oz can black beans
1 16-oz can kidney beans
1 8-oz can tomato sauce
1 can corn, drained
2 14.5-oz cans diced tomatoes w/chilies (I used Rotel)
1 packet taco seasoning
1 tbsp cumin
1 tbsp chili powder, or to taste
24 oz (3-4) boneless skinless chicken breasts
any desired toppings - sour cream, cheese, cilantro, rice

Combine everything in slow cooker except for chicken; mix well. Lay chicken on top (cut breasts into fours if you want it to cook faster) and cover. Cook on high for 6 hours, or low for 10 hours. Half an hour before cook time is over, remove chicken to shred, and then stir back in.

adapted from Skinny Taste.

November 14, 2011

Cabinet reorganization

So I had a problem with my glasses/mugs/cups cabinet. There were no shelves that fit the height of our water bottles and travel mugs, the top shelf was too hard to reach to even think about keeping it organized, and it all was just cluttered. A couple weeks ago I got fed up and started brainstorming.


I like having the glasses right next to the fridge and sink, and also having the coffee mugs above the coffee maker. So moving anything in this cabinet wasn't an option for the way this kitchen is set up. After living with this for over a year, trying to figure out a solution, I suddenly realized something. Renting does not mean customization is not allowed! I found out how the shelves were clipped in, and simply moved the clips down a few notches: 1 notch down for the middle shelf, and 2 notches down for the top shelf (I measured the height of the travel mugs to figure out how much space the top shelf would need first).

And, voila!


I got rid of the useless space above the glasses, and did away with stacking the mugs. It is so nice that I can actually reach the travel mugs and that we have some plastic cups that are easier to get to. It's pretty obvious that I got rid of a few mugs, too. The chipped ones and that free blood drive one had to go anyway, so this little project helped me get that accomplished as well! Hopefully on my trip to Goodwill I'll find something good to DIY. I'm in the mood for a project, and there is still a lot to do in the office.


I love my newly-organized cabinet. It's also inspiring me to find out what else in my kitchen could be organized better, like my tupperware cabinet or my pantry. Hmm, not sure if I'm ready to tackle those yet...